Getting started
Create a new project
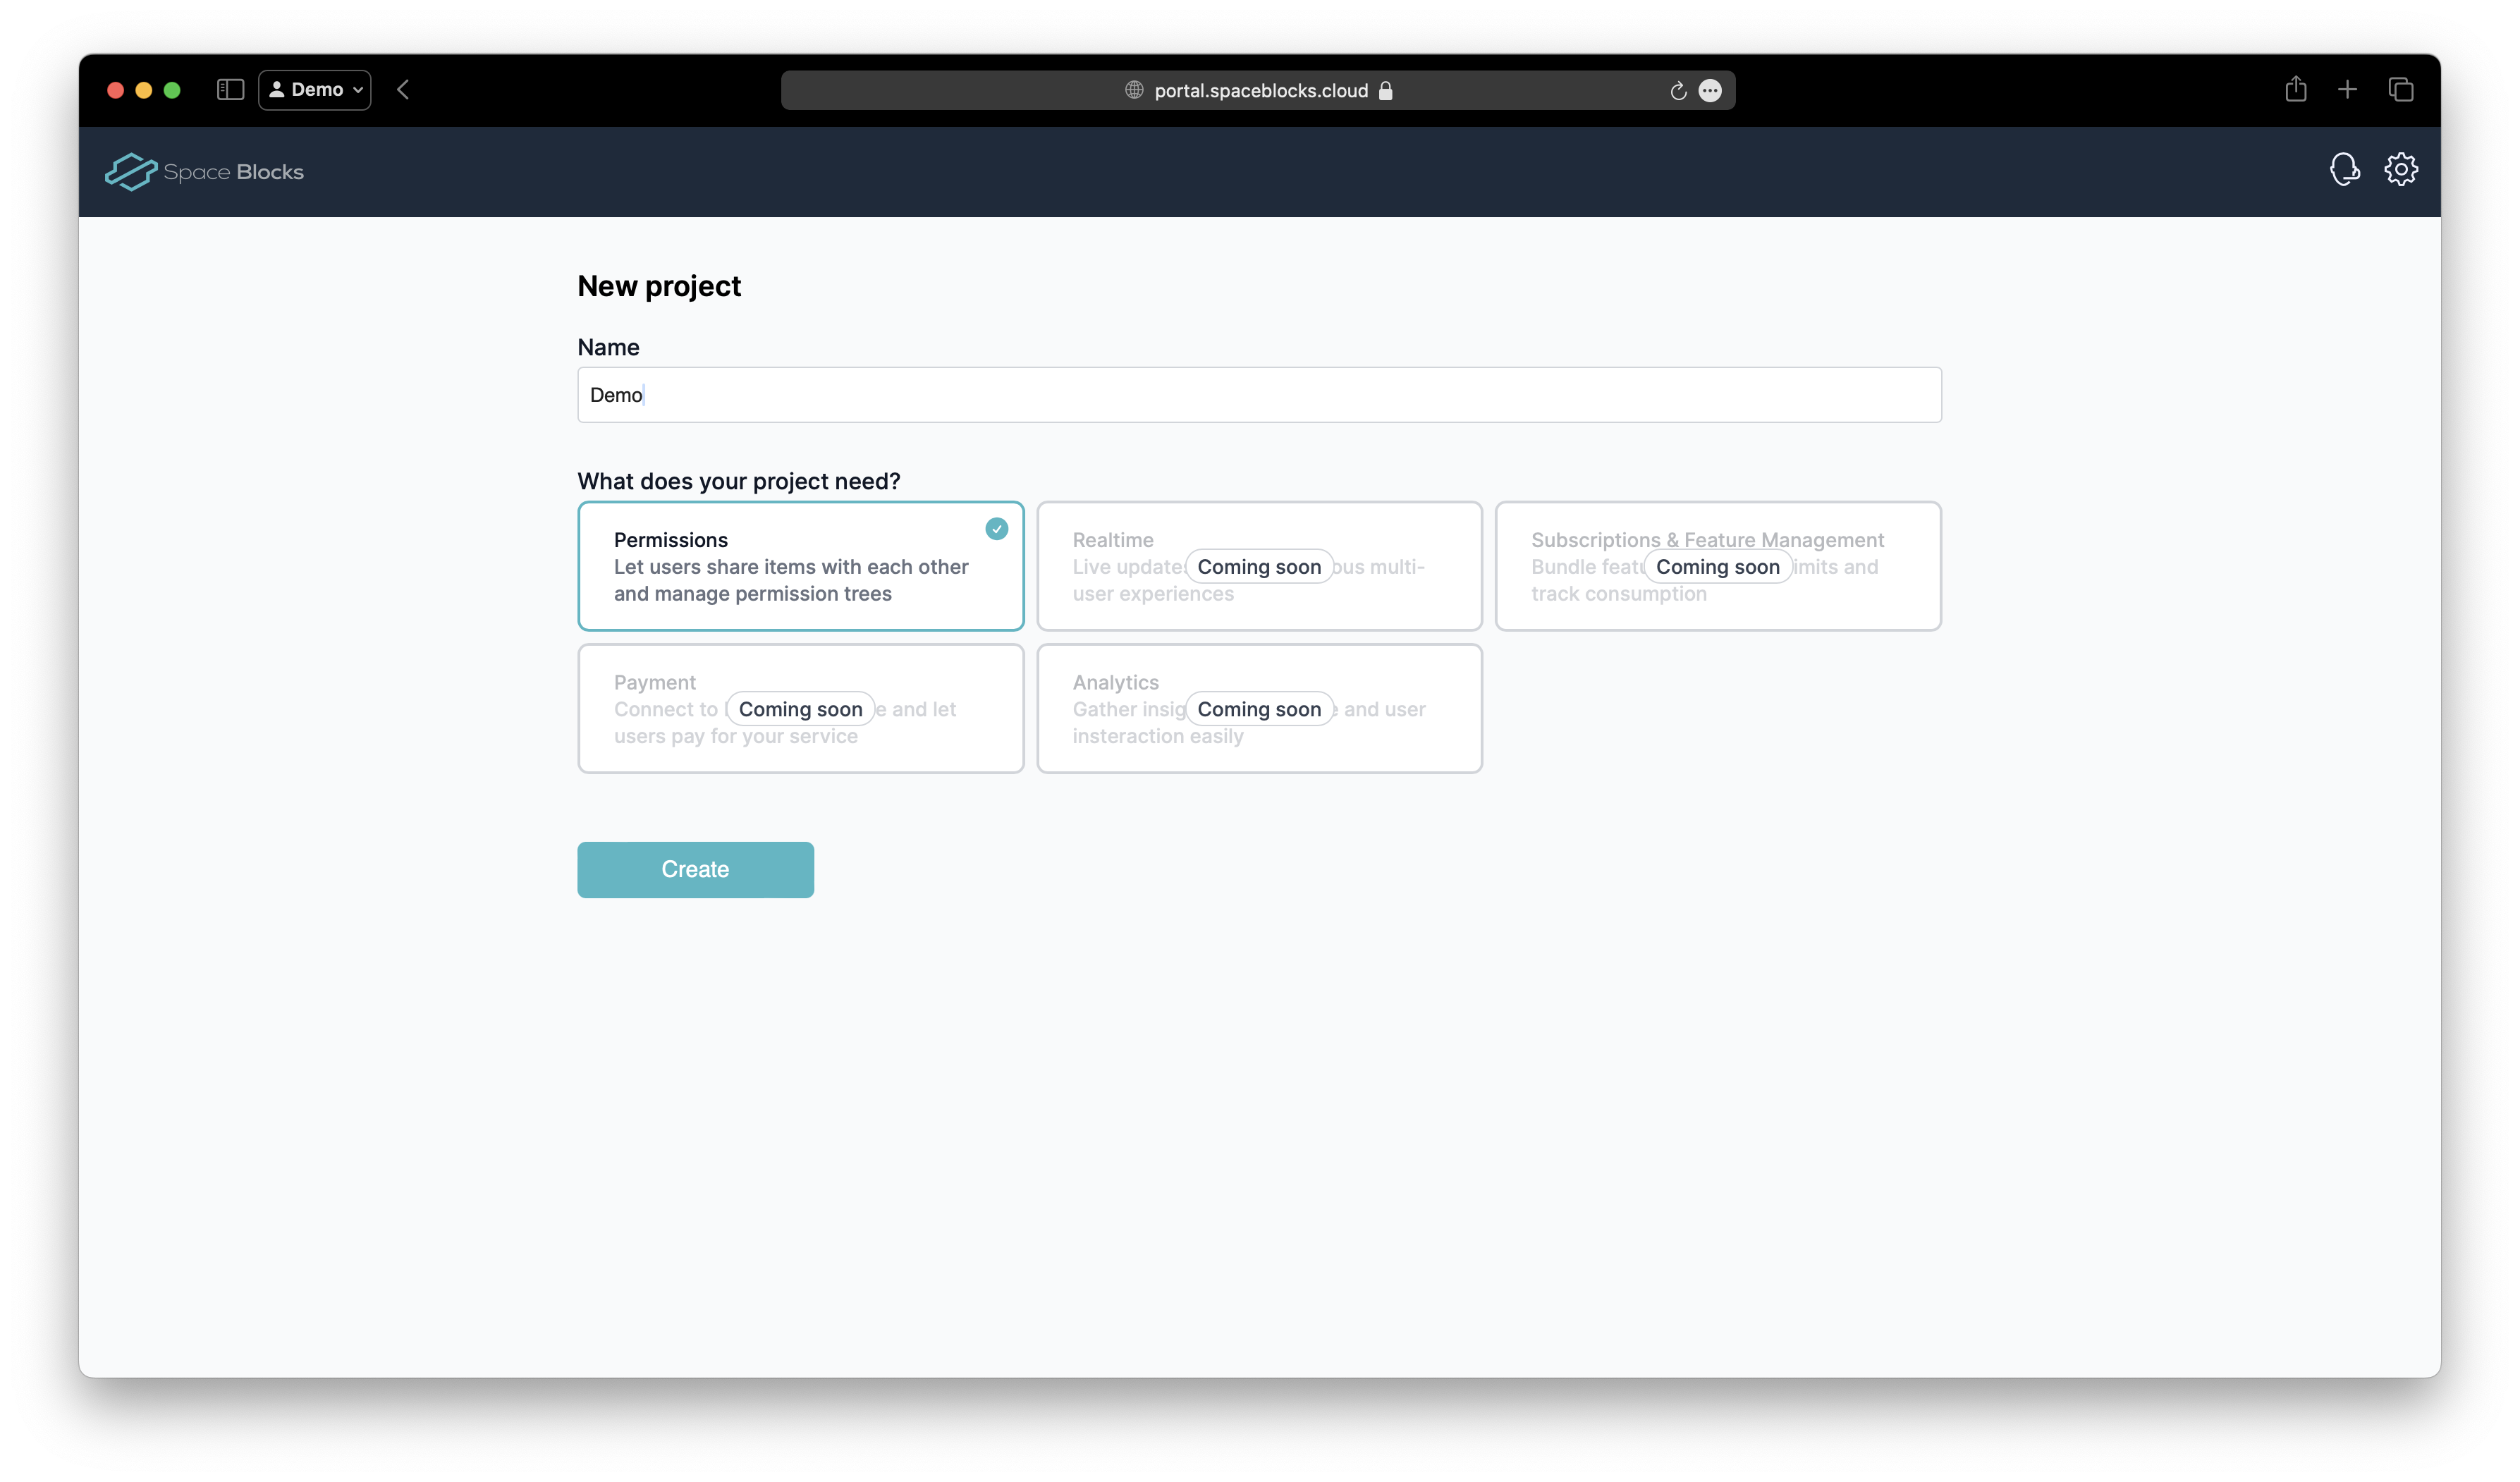
We start with creating a new project in the Space Blocks Developer Portal. If you don't have an account yet, you can sign up here with a few easy steps. No credit card is required.
Click the New Project button in the top right corner of the portal, give the project a name and click Create.
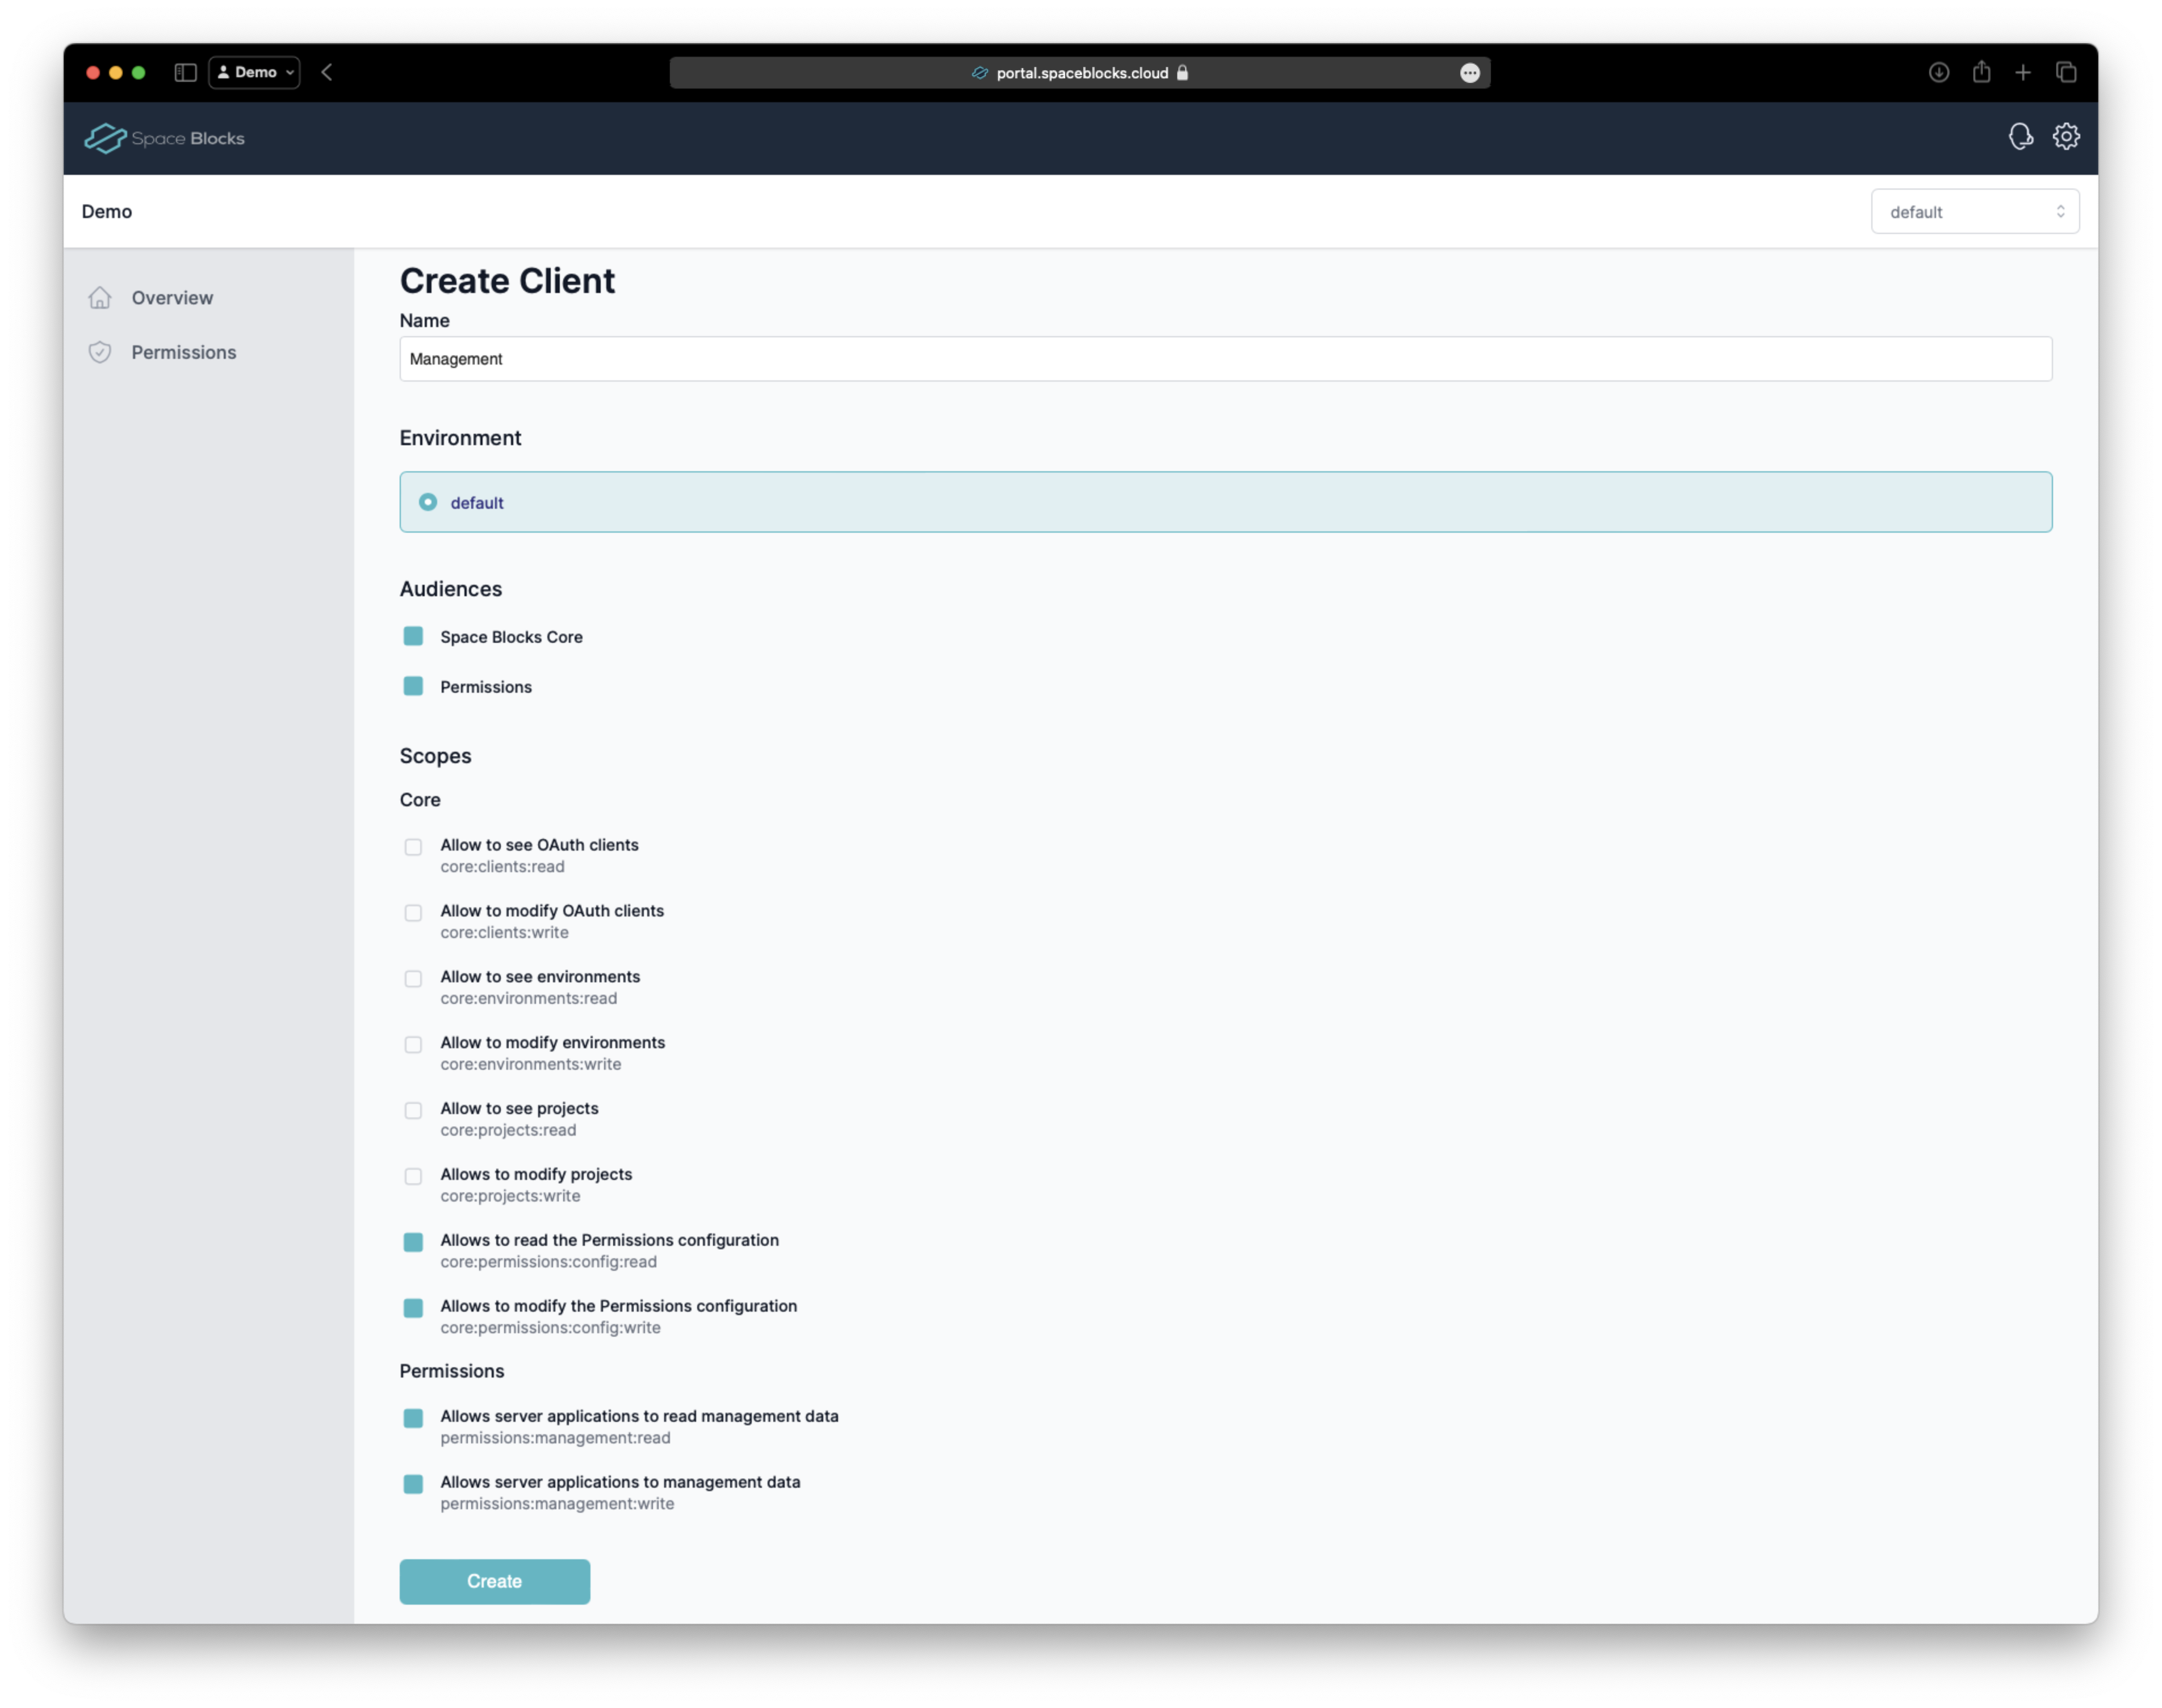
Once the project has been created, we need to create an OAuth Client for it, to be able to call the API later. Click the Create button in the client section of your project, give the client a name and select the following configuration:
- Environment: default
- Audiences: Space Blocks Core, Permissions
- Scopes:
core:permissions:config:read,core:permissions:config:write,permissions:management:read,permissions:management:write
Click Create to create the client.
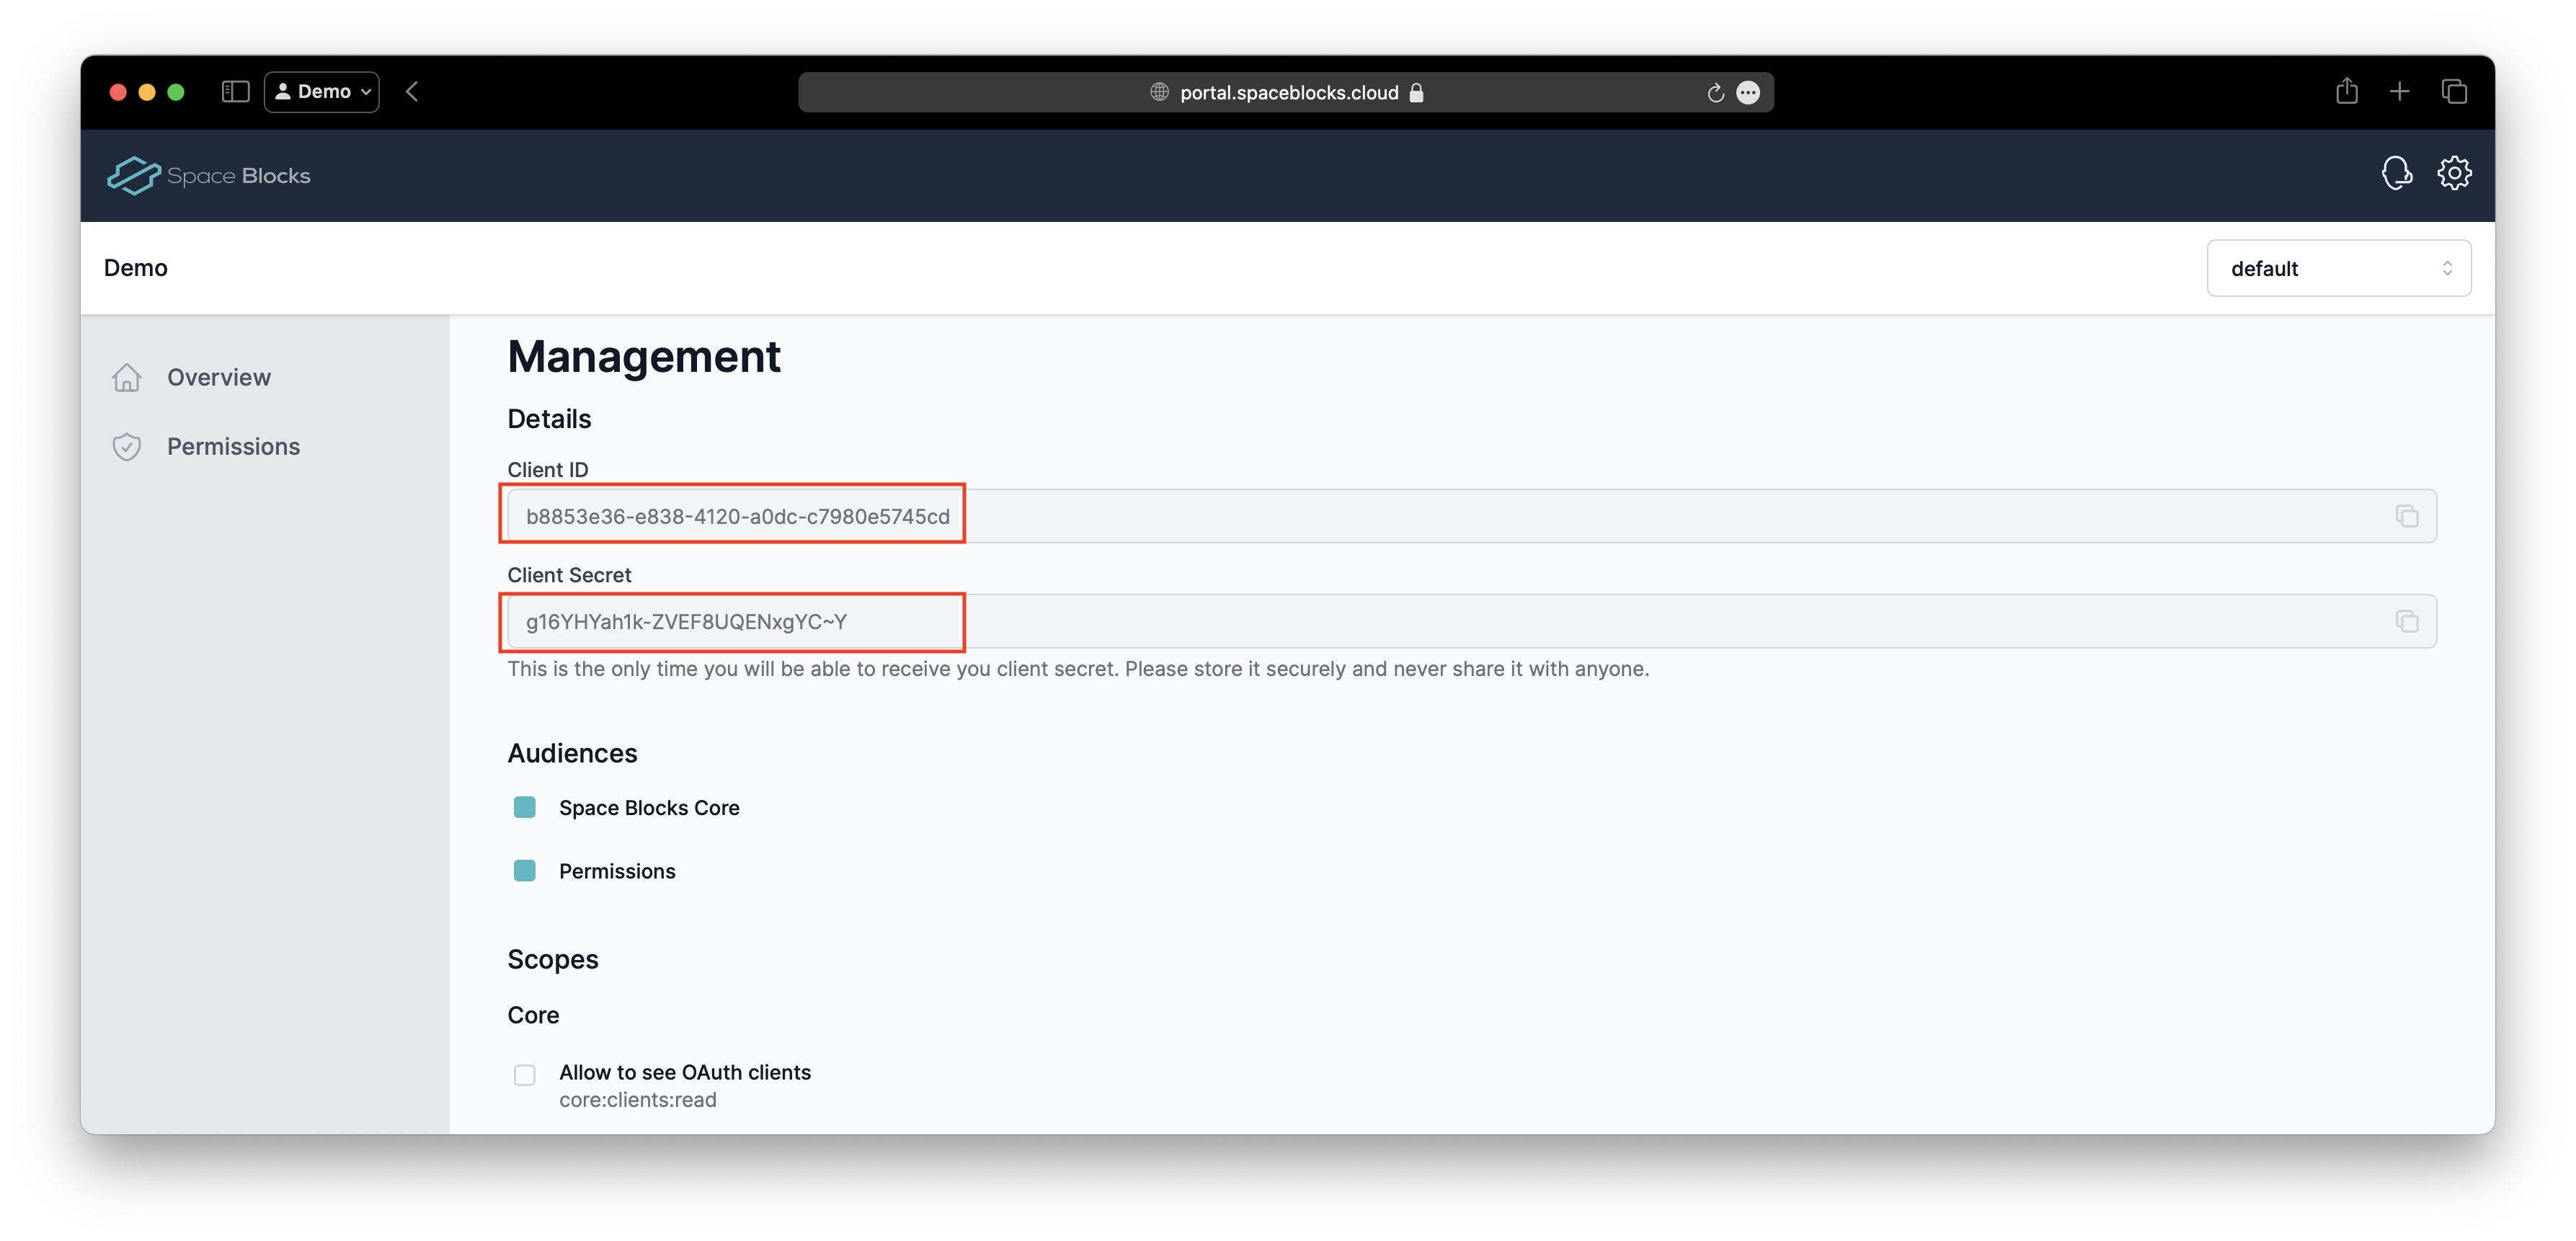
After the client has been created, you can copy the Client ID and Client Secret from the client details page. We will need them later to authenticate against the Management API.
The Client Secret is only shown once after the client has been created. If you don't copy the Client Secret now, you will have to create a new one.
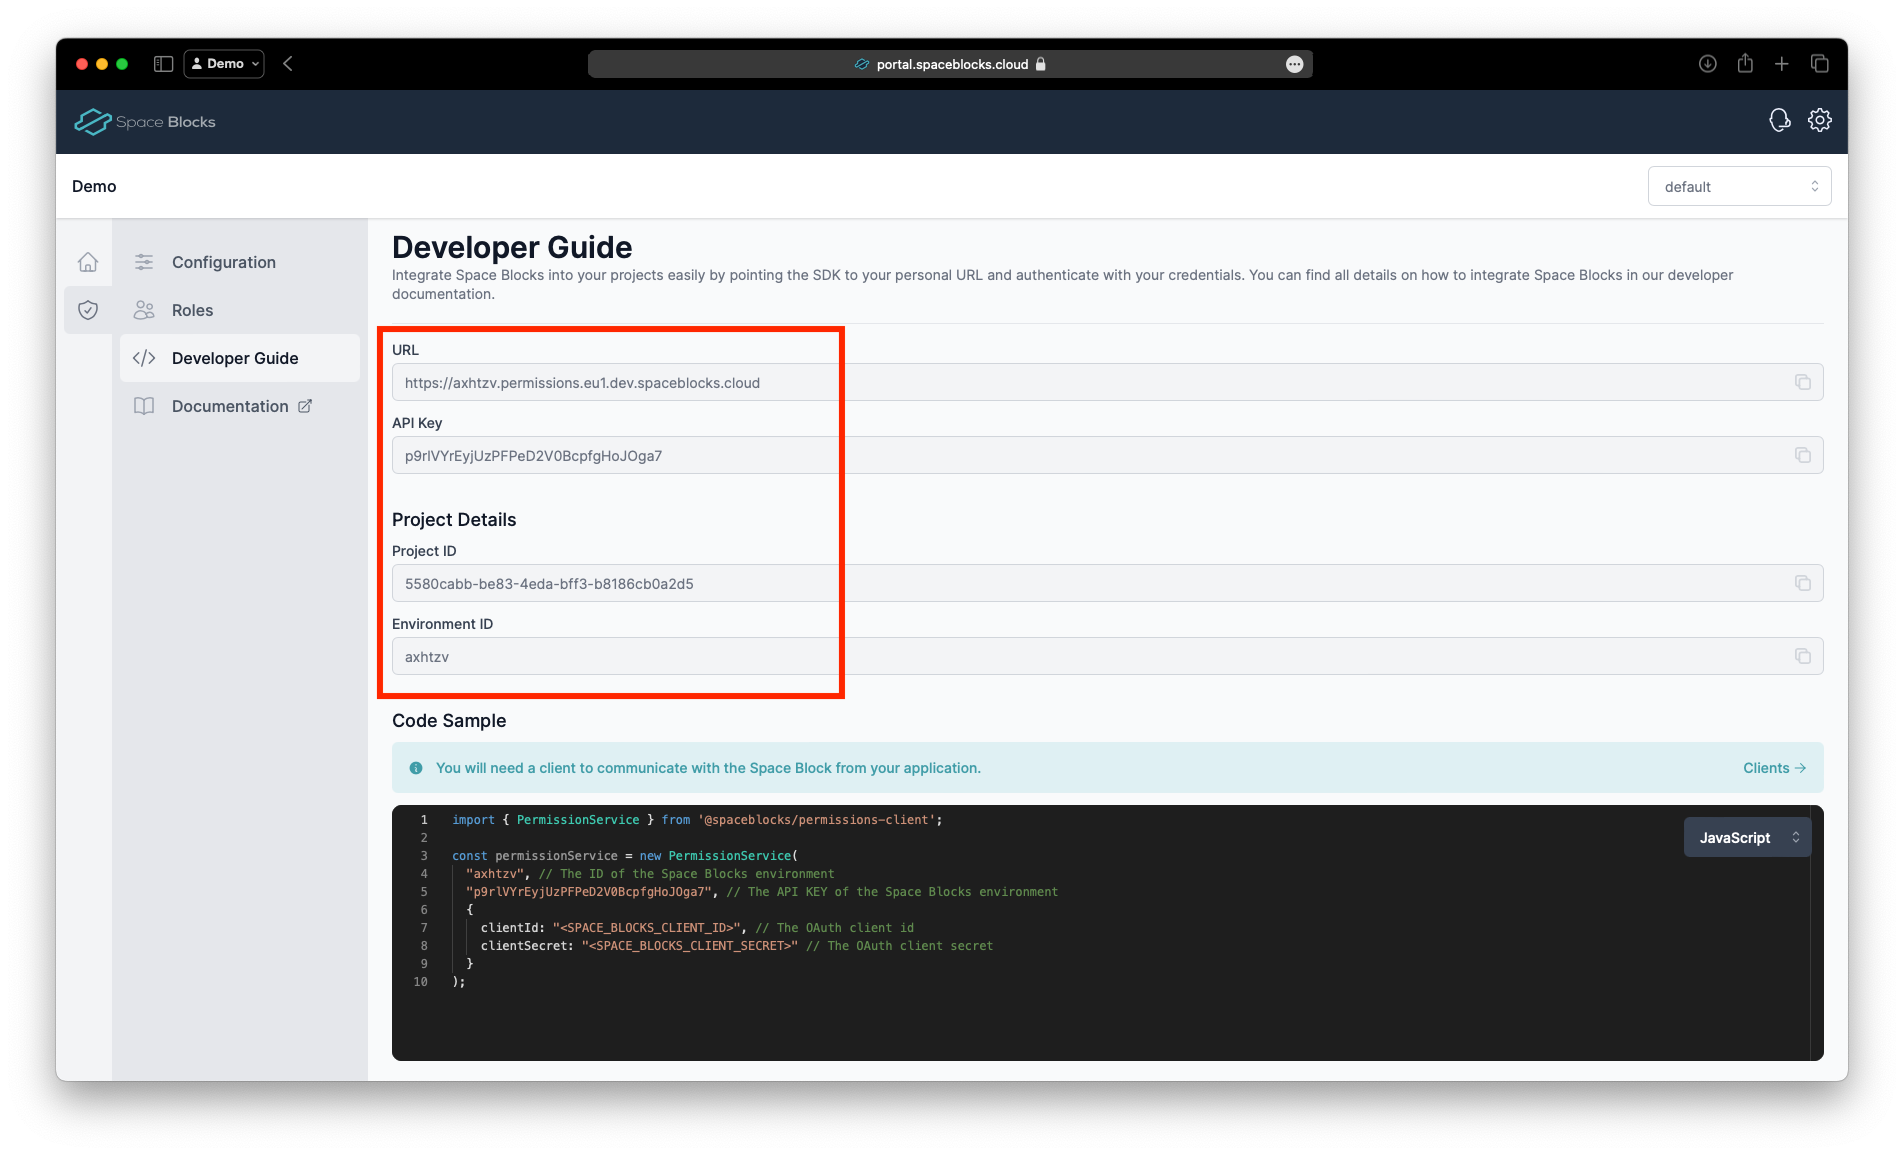
Lastly, we need to copy the API URL and API Key from the project's Developer Settings. We will need them later to call the Permissions API. For this, click on Permissions in the left navigation bar and then on Developer Guide. Now copy URL and API Key for later.
And that's it! Your Permissions Space Block is now ready and you have everything to start configuring and using it.
- ✅ API URL
- ✅ API Key
- ✅ Project ID
- ✅ Environment ID
- ✅ Client ID
- ✅ Client Secret
Let's get started! 🚀
Configuration
Before we can start using the Permissions Space Block, we need to configure it. For this, we will use the Management API. The Management API is a REST API that allows you to manage your projects and Space Blocks programmatically.
Let's say we want to create a simple configuration that allows us to manage permissions for an accounting SaaS application. The application has the following resources:
- Invoices: Can be seen by all users including external tax accountants but only created and modified by internal users
- Offers: Can only be accessed by internal users
Plan the configuration
To translate these requirements into a configuration, we need to define Resource Types, their Permissions and Roles. From our experience, it helps to draw a diagram first to get a better understanding of the requirements. Your project's documentation is a great place to store these diagrams!


This diagram shows that we need two resource types: Invoice and Offer. Both resource types should have the same permissions: create, read, modify, and delete.
Please note, that there is always a Tenant at root level. Please see the Tenant documentation for more information and how to deal with single-tenant scenarios.
After defining, which Resource Types and Permissions exist in our application, we should define the roles, that users can have. For our requirements, we need two roles: Internal and Tax Accountant. The Internal role should have all permissions on all resources, whereas the Tax Accountant role should only have the read permission on the Invoice resources.


Great, that's all we need for now. Let's see, how we can apply this configuration to our project.
Apply the configuration
Now it's time to configure the project and add the Resource Types, Permissions, and Roles that we came up with to our project.
- Portal
- API
In the Developer Portal, navigate to your project, open the Permissions section in the left navigation bar and select Configuration, to open the configuration editor.
Create Resource Types
As you can see, the Tenant is already existant. According to our planning diagram, we need to add two more resource types: Invoice and Offer.
To create the Invoice resource type, click the small dot under the Tenant and drag from there it to a free space with your mouse. This will create a new Resource Type. Give it the name Invoice and the ID invoice. The ID is used to identify the resource type in the API.
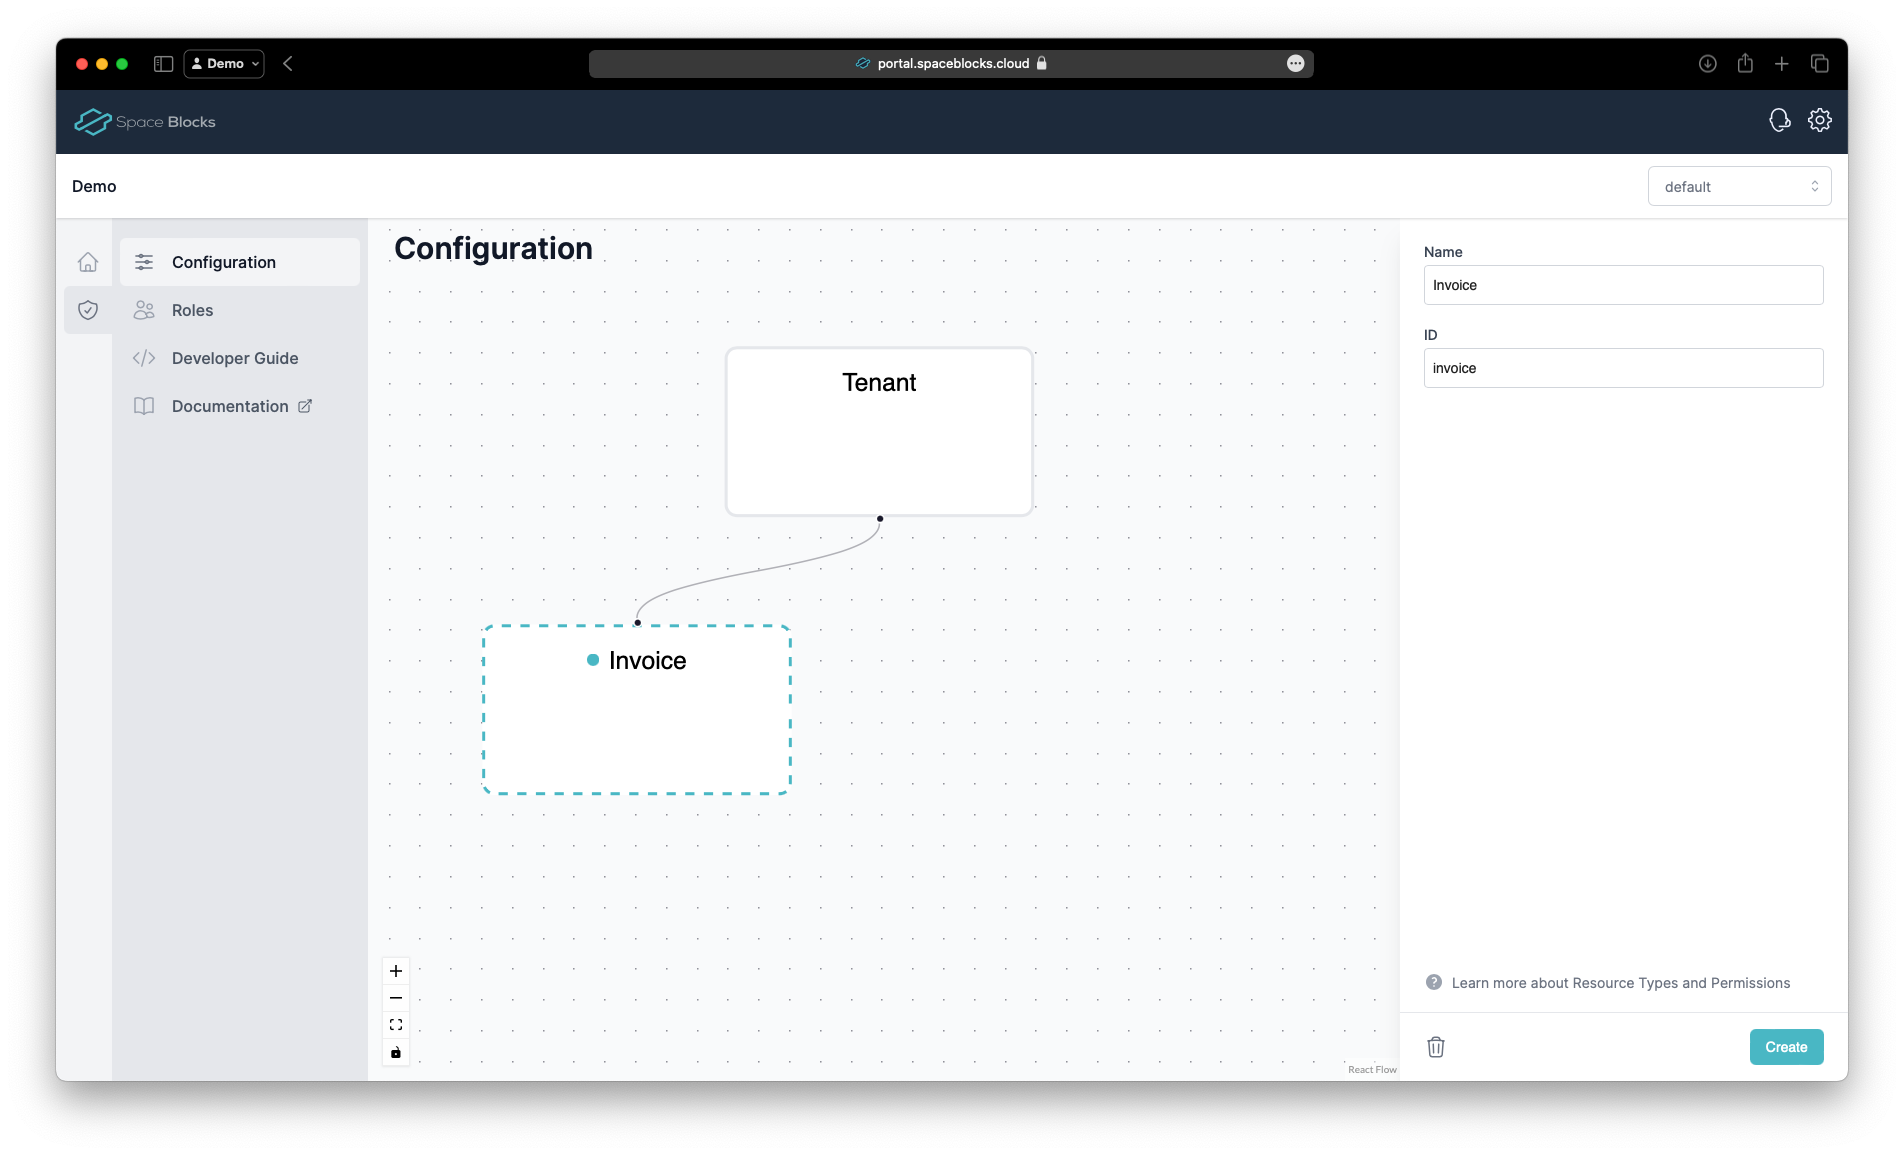
Click Save to save the resource type.
Now we can add permissions for the resource type. In case of the Invoice resource type, we need the permissions create, read, modify, and delete. Make sure the Invoice resource type is selected and click Add Permission in the details section on the right.
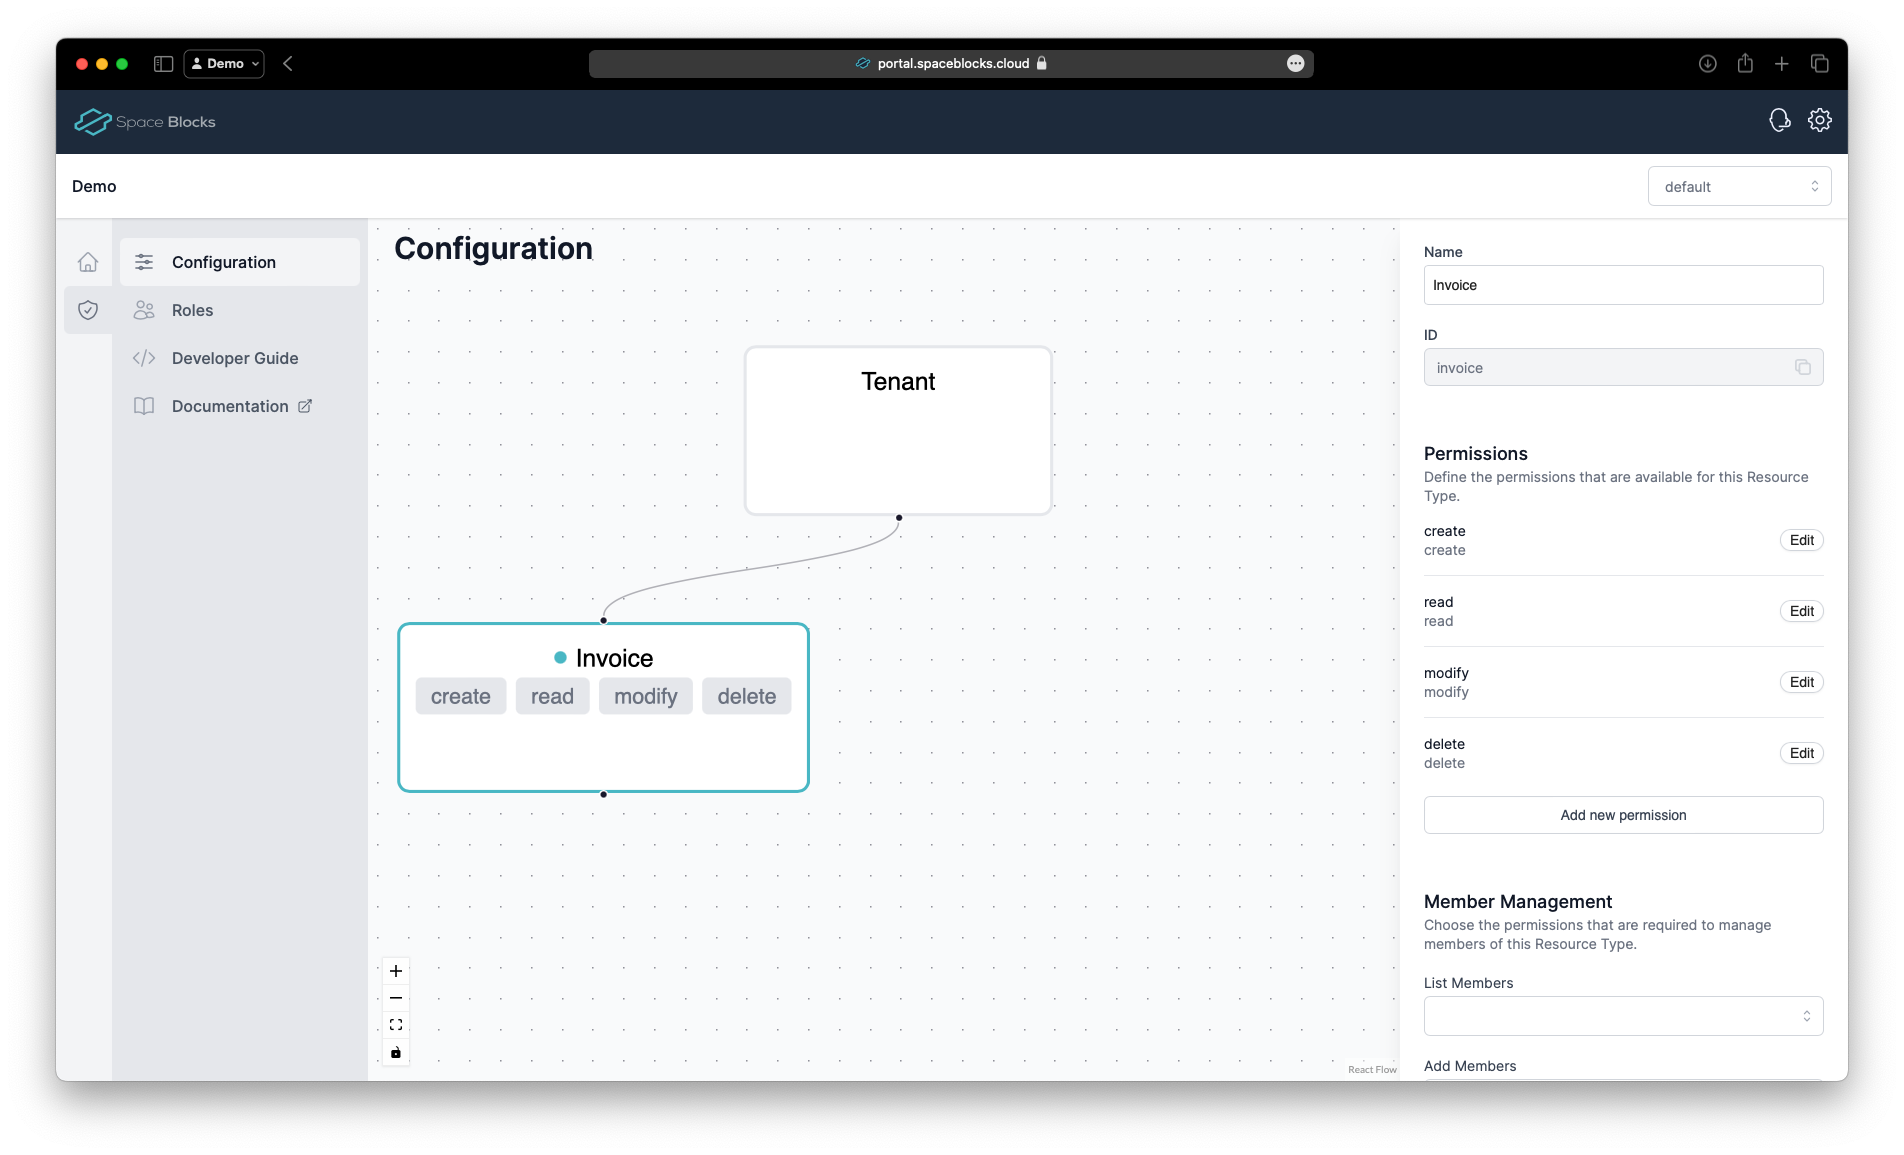
Click Save again to apply the changes to our configuration.
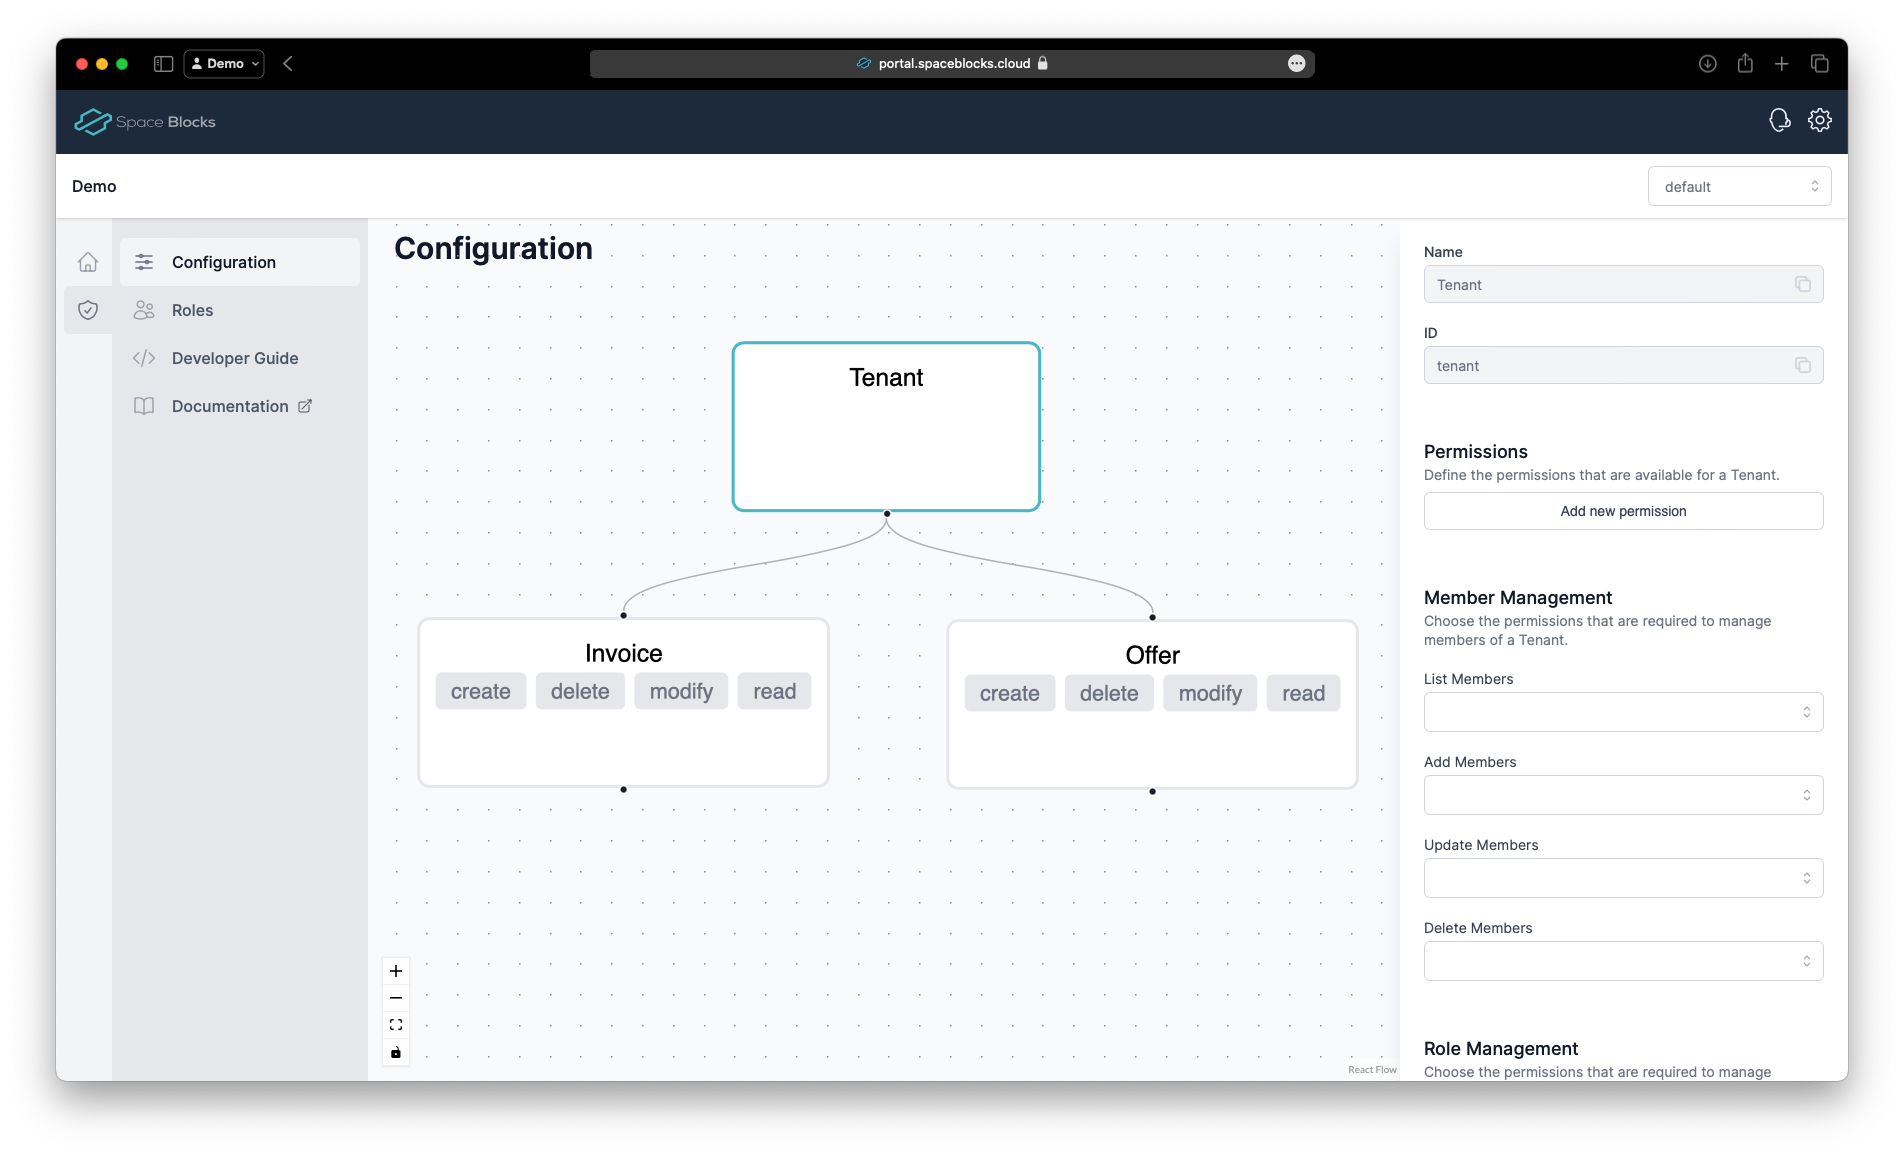
Now, we repeat the same steps with the Offer resource type. Create the resource type below the Tenant again, name it Offer with ID offer, add the permissions read, create, modify and delete and save the configuration.
Create the roles
Now that all resource types and permissions are defined, we can create the roles. As we have seen in the planning diagram, we need two roles: Internal and Tax Accountant.
To manage roles, select the Roles item from the menu bar on the left and click the Create button, to create a new role.
Add the Internal role. This role has all permissions on all resources. Give it the name Internal and ID internal and select all permissions by clicking in them in the diagram.
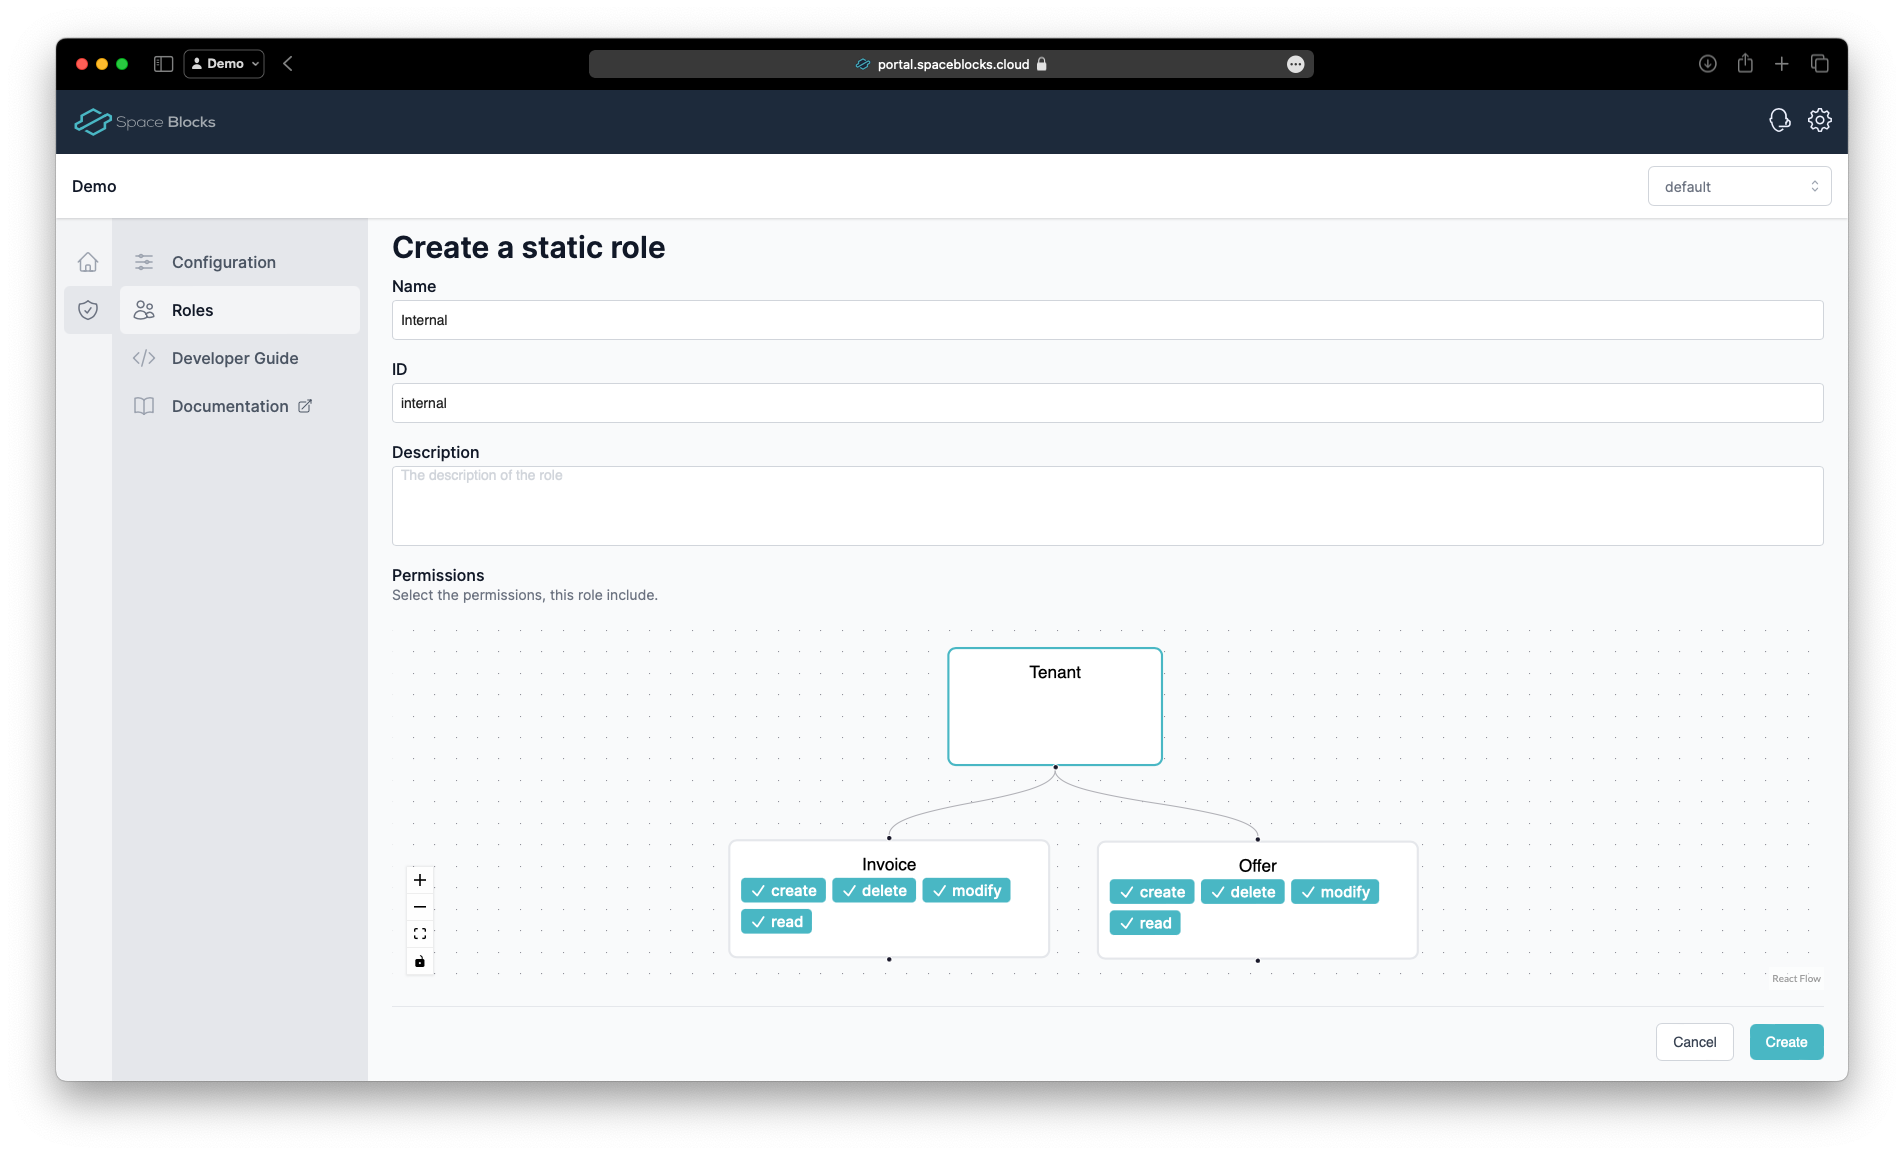
Click Create to create the role.
Now repeat the same process for the Tax Accountant static role. This role has only the read permission on the Invoice resources and no permissions on the Offer resources. Give it the name Tax Accountant and ID tax-accountant and only select the read permission for the Invoice resource type by clicking on it.
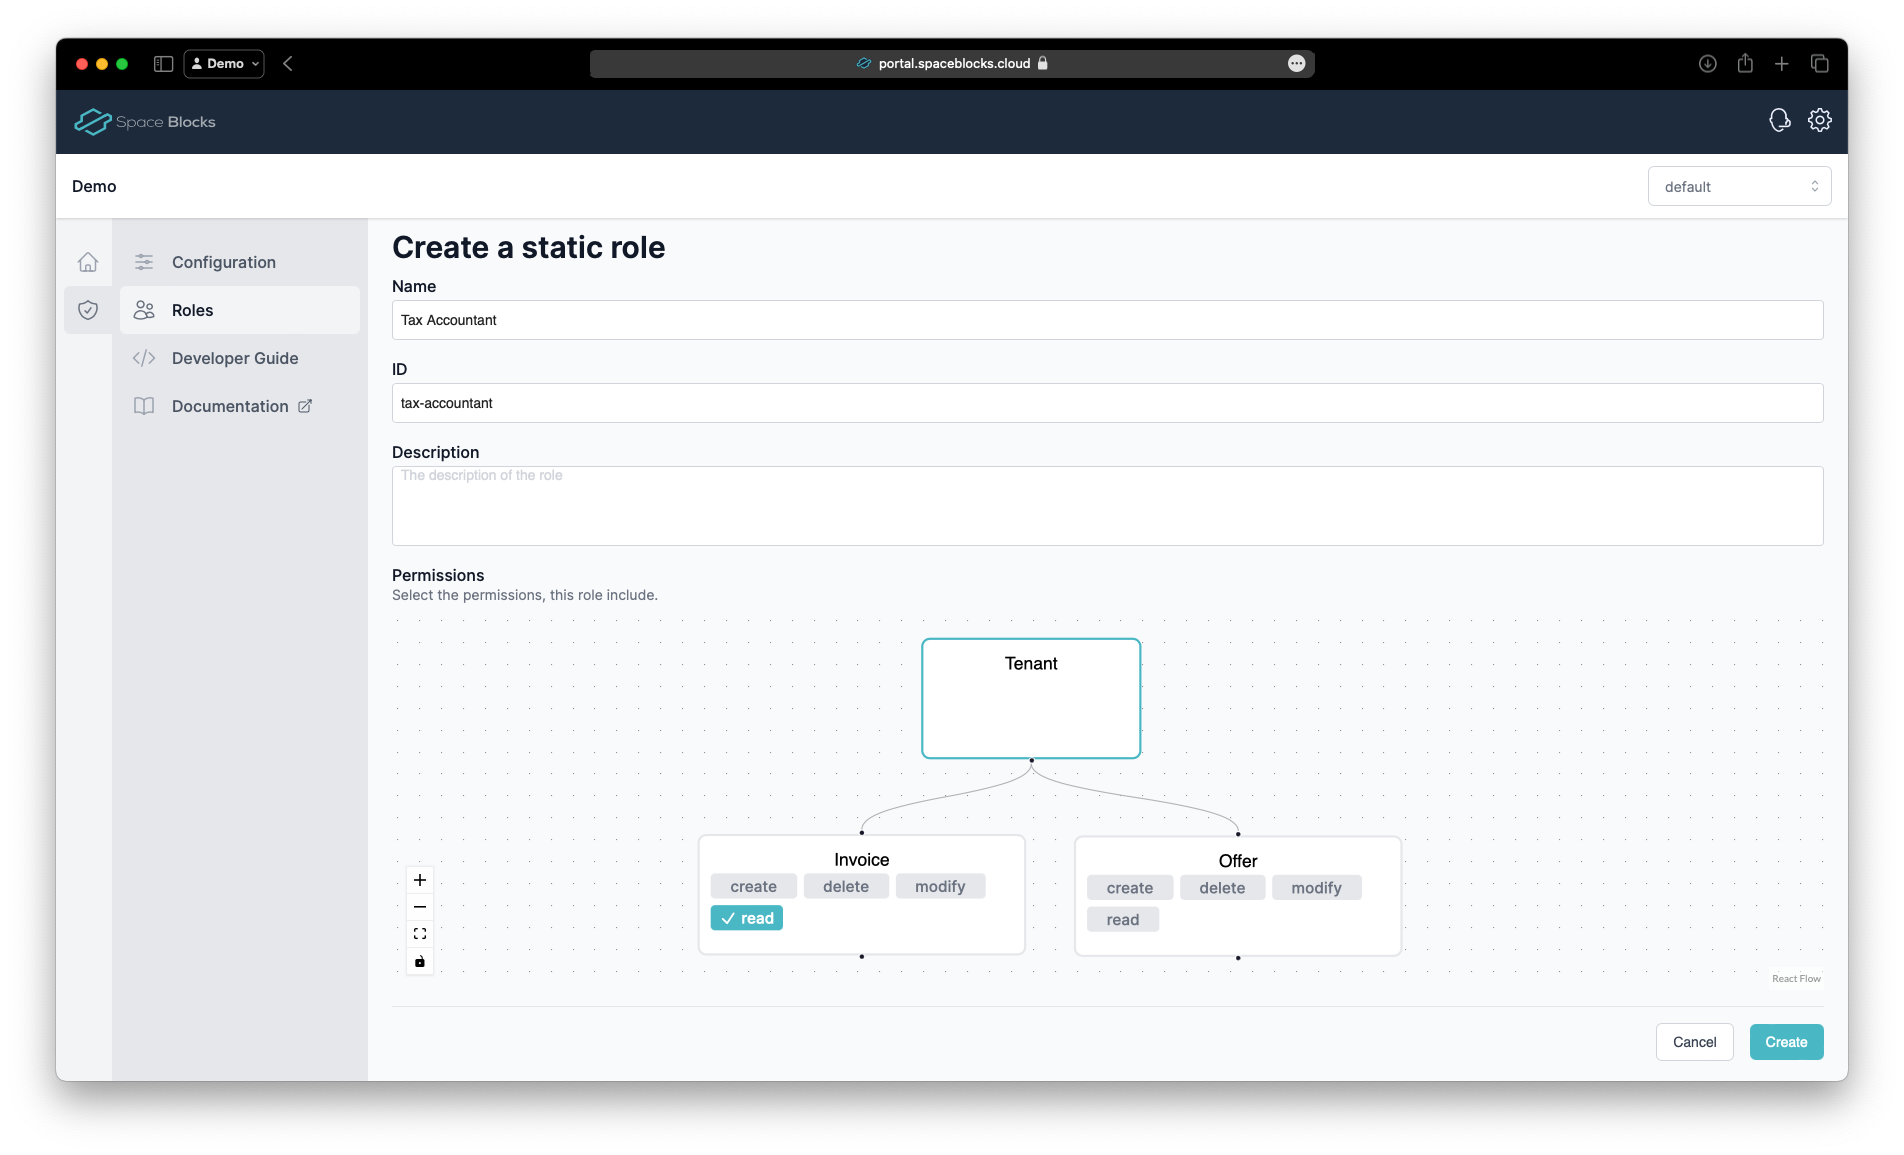
Click Create againt to create the role.
We will use the Management API. The Management API is a REST API that allows you to manage your projects and Space Blocks programmatically.
Prepare the API calls
Before we can start, we need to prepare the API calls by settings some Environment Variables.
PROJECT_ID=<YOUR_PROJECT_ID>
ENVIRONMENT_ID=<YOUR_ENVIRONMENT_ID>
API_KEY=<YOUR_API_KEY>
Acquire an access token
To communicate with the API, we need to acquire an access token first. For this, we will use the OAuth Client that we created earlier.
curl -i --location "https://auth.spaceblocks.cloud/token-manager/token" \
  --request POST \
  --header "Content-Type: application/json" \
  --header "apiKey: $API_KEY" \
  --data '{
    "client_id": "<YOUR_CLIENT_ID>",
    "client_secret": "<YOUR_CLIENT_SECRET>",
    "scope": "core:permissions:config:read core:permissions:config:write permissions:management:read permissions:management:write"
  }'
Once you received the token, copy the access_token value from the response and set it as an Environment Variable.
ACCESS_TOKEN=<YOUR_ACCESS_TOKEN>
Create Resource Types
Add the Invoice resource type.
curl -i --location "https://api.spaceblocks.cloud/public/projects/$PROJECT_ID/environments/$ENVIRONMENT_ID/permissions/config/resource-types" \
  --request POST \
  --header "Content-Type: application/json" \
  --header "Authorization: Bearer $ACCESS_TOKEN" \
  --data '{
    "id": "invoice",
    "name": "Invoice",
    "parentId: "tenant"
  }'
Define permissions for the Invoice resource type.
curl -i --location "https://api.spaceblocks.cloud/public/projects/$PROJECT_ID/environments/$ENVIRONMENT_ID/permissions/config/resource-types/invoice/permissions" \
  --request POST \
  --header "Content-Type: application/json" \
  --header "Authorization: Bearer $ACCESS_TOKEN" \
  --data '{
    "id": "read"
    "name": "read",
  }'
Repeat this step also for the other permissions create, modify and delete.
Add the Offer resource type.
curl -i --location "https://api.spaceblocks.cloud/public/projects/$PROJECT_ID/environments/$ENVIRONMENT_ID/permissions/config/resource-types" \
  --request POST \
  --header "Content-Type: application/json" \
  --header "Authorization: Bearer $ACCESS_TOKEN" \
  --data '{
    "id": "offer",
    "name": "Offer",
    "parentId: "tenant"
  }'
Define permissions for the Offer resource type.
curl -i --location "https://api.spaceblocks.cloud/public/projects/$PROJECT_ID/environments/$ENVIRONMENT_ID/permissions/config/resource-types/offer/permissions" \
  --request POST \
  --header "Content-Type: application/json" \
  --header "Authorization: Bearer $ACCESS_TOKEN" \
  --data '{
    "id": "read"
    "name": "read",
  }'
Repeat this step also for the other permissions create, modify and delete.
Create the roles
Now that all resource types and permissions are defined, we can create the roles. As we have seen in the planning diagram, we need two roles: Internal and Tax Accountant.
Add the Internal role. This role has all permissions on all resources.
curl -i --location "https://api.spaceblocks.cloud/public/projects/$PROJECT_ID/environments/$ENVIRONMENT_ID/permissions/config/roles" \
  --request POST \
  --header "Content-Type: application/json" \
  --header "Authorization: Bearer $ACCESS_TOKEN" \
  --data '{
    "id": "internal",
    "name": "Internal",
    "description": "Internal users",
    "permissions": {
      "invoice": [ "create", "read", "modify", "delete" ],
      "offer": [ "create", "read", "modify", "delete" ],
    }
  }'
Add the Tax Accountant static role. This role has only the read permission on the Invoice resources and no permissions on the Offer resources.
curl -i --location "https://api.spaceblocks.cloud/public/projects/$PROJECT_ID/environments/$ENVIRONMENT_ID/permissions/config/roles" \
  --request POST \
  --header "Content-Type: application/json" \
  --header "Authorization: Bearer $ACCESS_TOKEN" \
  --data '{
    "id": "tax-accountant",
    "name": "Tax Accountant",
    "description": "Tax Accountants",
    "permissions": {
      "invoice": [ "read" ],
      "offer": []
    }
  }'
Thats it! We have successfully configured the Permissions Space Block and defined our Resource Types, Permissions, and Roles. Let's see how we can use it now.
Seed data
To play around with the Permissions Module, we need some seed data. We will use the Management API again, to seed some dummy data.
You still manage the resources and users in your application. The Permissions Module only stores the IDs and the client.
Let's create the following seed data:
- 1 Tenant with the ID
default - 2 Invoices with the IDs
1and2 - 1 Offer with the ID
A - User
Alice, who gets theInternalrole assigned - User
Lina, who gets theTax Accountantrole assigned
- API
- C#
- JavaScript
- Python
- Java
- Golang
Prepare the API calls
Before we can start, we need to prepare the API calls by settings some Environment Variables. You will find the Permsissions URL and API Key in the Developer Portal in the Developer settings of your project.
PERMISSIONS_URL=<YOUR_URL>
API_KEY=<YOUR_API_KEY>
Acquire an access token
To communicate with the API, we need to acquire an access token first. For this, we will use the OAuth Client that we created earlier.
curl -i --location https://auth.spaceblocks.cloud/token-manager/token \
  --request POST \
  --header "Content-Type: application/json" \
  --header "apiKey: $API_KEY" \
  --data '{
    "client_id": "<YOUR_CLIENT_ID>",
    "client_secret": "<YOUR_CLIENT_SECRET>",
    "scope": "core:permissions:config:read core:permissions:config:write permissions:management:read permissions:management:write"
  }'
Once you received the token, copy the access_token value from the response and set it as an Environment Variable.
ACCESS_TOKEN=<YOUR_ACCESS_TOKEN>
Seed the data
Create a tenant.
curl -i --location "$PERMISSIONS_URL/management/tenants" \
  --request POST \
  --header "Content-Type: application/json" \
  --header "Authorization: Bearer $ACCESS_TOKEN" \
  --header "apiKey: $API_KEY" \
  --data '{
    "id": "default",
    "name": "Default"
  }'
Create the invoices in the default tenant we just created.
curl -i --location "$PERMISSIONS_URL/management/tenants/default/resources/invoice" \
  --request POST \
  --header "Content-Type: application/json" \
  --header "Authorization: Bearer $ACCESS_TOKEN" \
  --header "apiKey: $API_KEY" \
  --data '{
    "id": "1",
    "name": "Invoice 1",
    "parent": {
      "id" : "default"
    }
  }'

curl -i --location "$PERMISSIONS_URL/management/tenants/default/resources/invoice" \
  --request POST \
  --header "Content-Type: application/json" \
  --header "Authorization: Bearer $ACCESS_TOKEN" \
  --header "apiKey: $API_KEY" \
  --data '{
    "id": "2",
    "name": "Invoice 2",
    "parent": {
      "id" : "default"
    }
  }'
Create the offer in the default tenant we just created.
curl -i --location "$PERMISSIONS_URL/management/tenants/default/resources/offer" \
  --request POST \
  --header "Content-Type: application/json" \
  --header "Authorization: Bearer $ACCESS_TOKEN" \
  --header "apiKey: $API_KEY" \
  --data '{
    "id": "A",
    "name": "Offer A",
    "parent": {
      "id" : "default"
    }
  }'
Add the users with their role assignments.
curl -i --location "$PERMISSIONS_URL/management/tenants/default/members" \
  --request PATCH \
  --header "Content-Type: application/json" \
  --header "Authorization: Bearer $ACCESS_TOKEN" \
  --header "apiKey: $API_KEY" \
  --data '{
    "subjects": {
      "alice": ["internal"],
      "linda": ["tax-accountant"]
    }
  }'
Assigning roles to users triggers recalculation of the permissions for the affected resources. This is done asynchronously in the background and might take a few moments before the updates are propagated.
Initialize the SDK
Before we can start, we need to add the Permissions Server SDK NuGet package to our project.
dotnet add package SpaceBlocks.Permissions.Server
Once installed, we can instantiate the SDK with the API URL and API Key from the Developer Portal.
var auth = new AuthenticationOptions(
    "<API_KEY>",
    "<YOUR_CLIENT_ID>",
    "<YOUR_CLIENT_SECRET>",
    "core:permissions:config:read core:permissions:config:write permissions:management:read permissions:management:write");

var client = new PermissionsClient(new Uri("<YOUR_PERMISSIONS_URL>"), "<API_KEY>", auth);
Seed the data
Create a tenant.
await client.TenantApi.CreateTenantAsync(new CreateTenantRequest("default", "Default"));
Create the invoices in the default tenant we just created.
await client.ResourceApi.CreateResourceAsync(
    "default",
    "invoice",
    new CreateResourceRequest("1", new CreateResourceParent("default")));

await client.ResourceApi.CreateResourceAsync(
    "default",
    "invoice",
    new CreateResourceRequest("2", new CreateResourceParent("default")));
Create the offer in the default tenant we just created.
await client.ResourceApi.CreateResourceAsync(
    "default",
    "offer",
    new CreateResourceRequest("A", new CreateResourceParent("default")));
Add the users with their role assignments.
await client.TenantApi.PatchTenantMembersAsync(
    "default",
    new ResourceMembers(new Dictionary<string, List<string>>() {
        { "alice", ["internal"] },
        { "linda", ["tax-accountant"] }
    }));
Initialize the SDK
Before we can start, we need to add the Permissions Server SDK NPM package to our project.
npm install @spaceblocks/permissions-server
Once installed, we can instantiate the SDK with the API URL and API Key from the Developer Portal.
const client = new PermissionsClient('<YOUR_PERMISSIONS_URL>', '<YOUR_API_KEY>', {
  clientId: '<YOUR_CLIENT_ID>',
  clientSecret: '<YOUR_CLIENT_SECRET>'
});
Seed the data
Create a tenant.
await client.tenantApi.createTenant(new CreateTenantRequest('default', 'Default'));
Create the invoices in the default tenant we just created.
await client.resourceApi.createResource(
  'default',
  'invoice',
  new CreateResourceRequest('1', new CreateResourceParent('default'))
);

await client.resourceApi.createResource(
  'default',
  'invoice',
  new CreateResourceRequest('2', new CreateResourceParent('default'))
);
Create the offer in the default tenant we just created.
await client.resourceApi.createResource(
  'default',
  'offer',
  new CreateResourceRequest('A', new CreateResourceParent('default'))
);
Add the users with their role assignments.
await client.tenantApi.patchTenantMembers(
  'default',
  new Members([{ alice: ['internal'] }, { linda: ['tax-accountant'] }])
);
Coming soon... 🙈
# You found our next update. We are currently working on the Python SDK and will release it soon.
# If you are interested in the private Beta, we can send you an early build.

if interested == True:
  # Please contact us
  write_email('hello@spaceblocks.cloud')
Coming soon... 🙈
// You found our next update. We are currently working on the Java SDK and will release it soon.
// If you are interested in the private Beta, we can send you an early build.

if (interested == true) {
  // Please contact us
  WriteEmail('hello@spaceblocks.cloud');
}
Coming soon... 🙈
// You found our next update. We are currently working on the Go SDK and will release it soon.
// If you are interested in the private Beta, we can send you an early build.

if interested == true {
  // Please contact us
  write_email("hello@spaceblocks.cloud");
}
Call the API
- API
- C#
- JavaScript
- Python
- Java
- Golang
Prepare the API calls
Before we can start, we need to prepare the API calls by settings some Environment Variables.
PROJECT_ID=<YOUR_PROJECT_ID>
ENVIRONMENT_ID=<YOUR_ENVIRONMENT_ID>
API_KEY=<YOUR_API_KEY>
Acquire an access token
To communicate with the API, we need to acquire an access token first. For this, we will use the OAuth Client that we created earlier.
curl -i --location "https://auth.spaceblocks.cloud/token-manager/token" \
  --request POST \
  --header "Content-Type: application/json" \
  --header "apiKey: $API_KEY" \
  --data '{
    "client_id": "<YOUR_CLIENT_ID>",
    "client_secret": "<YOUR_CLIENT_SECRET>",
    "scope": "permissions:management:read permissions:management:write"
  }'
Once you received the token, copy the access_token value from the response and set it as an Environment Variable.
ACCESS_TOKEN=<YOUR_ACCESS_TOKEN>
Initialize the SDK
Before we can start, we need to add the Permissions Server SDK NuGet package to our project.
dotnet add package SpaceBlocks.Permissions.Server
Once installed, we can instantiate the SDK with the API URL and API Key from the Developer Portal.
var auth = new AuthenticationOptions(
    "<API_KEY>",
    "<YOUR_CLIENT_ID>",
    "<YOUR_CLIENT_SECRET>",
    "permissions:management:read permissions:management:write");

var client = new PermissionsClient(new Uri("<YOUR_PERMISSIONS_URL>"), "<API_KEY>", auth);
Initialize the SDK
Before we can start, we need to add the Permissions Server SDK NPM package to our project.
npm install @spaceblocks/permissions-server
Once installed, we can instantiate the SDK with the API URL and API Key from the Developer Portal.
const client = new PermissionsClient('<YOUR_PERMISSIONS_URL>', '<YOUR_API_KEY>', {
  clientId: '<YOUR_CLIENT_ID>',
  clientSecret: '<YOUR_CLIENT_SECRET>'
});
Coming soon... 🙈
# You found our next update. We are currently working on the Python SDK and will release it soon.
# If you are interested in the private Beta, we can send you an early build.

if interested == True:
  # Please contact us
  write_email('hello@spaceblocks.cloud')
Coming soon... 🙈
// You found our next update. We are currently working on the Java SDK and will release it soon.
// If you are interested in the private Beta, we can send you an early build.

if (interested == true) {
  // Please contact us
  WriteEmail('hello@spaceblocks.cloud');
}
Coming soon... 🙈
// You found our next update. We are currently working on the Go SDK and will release it soon.
// If you are interested in the private Beta, we can send you an early build.

if interested == true {
  // Please contact us
  write_email("hello@spaceblocks.cloud");
}
Get permissions
Let's start with checking all members with all their permissions in the tenant default. Although, we have no assigned any permissions directly, the Permissions Space Block automatically calculates the permissions for each user based on the roles that they have assigned.
This is helpful, if you want to display, who has which permissions on which resources in your application.
- API
- C#
- JavaScript
- Python
- Java
- Golang
curl -i --location "$PERMISSIONS_URL/management/tenants/default/permissions" \
  --request GET \
  --header "Content-Type: application/json" \
  --header "Authorization: Bearer $ACCESS_TOKEN" \
  --header "apiKey: $API_KEY"
var permissions = await client.TenantApi.GetTenantPermissionsAsync("default");
const permissions = await client.permissionApi.tenantApi.getTenantPermissions('default');
Coming soon... 🙈
# You found our next update. We are currently working on the Python SDK and will release it soon.
# If you are interested in the private Beta, we can send you an early build.

if interested == True:
  # Please contact us
  write_email('hello@spaceblocks.cloud')
Coming soon... 🙈
// You found our next update. We are currently working on the Java SDK and will release it soon.
// If you are interested in the private Beta, we can send you an early build.

if (interested == true) {
  // Please contact us
  WriteEmail('hello@spaceblocks.cloud');
}
Coming soon... 🙈
// You found our next update. We are currently working on the Go SDK and will release it soon.
// If you are interested in the private Beta, we can send you an early build.

if interested == true {
  // Please contact us
  write_email("hello@spaceblocks.cloud");
}
Response:
{
  "subjects": {
    "alice": {
      "invoice": ["read", "create", "modify", "delete"],
      "offer": ["read", "create", "modify", "delete"]
    },
    "linda": {
      "invoice": ["read"],
      "offer": []
    }
  }
}
Check permissions
Next, we can check, if Linda, who has the Tax Accountant role assigned, has the read permission on the Order with the ID A. As Tax Accountant should not see any offers, this should return false.
This is helpful, if a user has a direct link to a resource, but you want to check, if the user has the permission to access it.
- API
- C#
- JavaScript
- Python
- Java
- Golang
curl -i --location "$PERMISSIONS_URL/management/tenants/default/permissions/check?resourceType=offer&resourceId=A&permissionScope=offer&permission=read&subjectId=linda" \
  --request GET \
  --header "Content-Type: application/json" \
  --header "Authorization: Bearer $ACCESS_TOKEN" \
  --header "apiKey: $API_KEY"
var result = await client.PermissionApi.CheckPermissionsAsync(
  tenantId: "default",
  resourceTypeId: "offer",
  resourceId: "A",
  permissionScope: "offer",
  permission: new List<string> { "read" },
  subjectId: "linda");
const result = await client.permissionApi.checkPermissions('default', 'offer', 'A', 'offer', ['read'], 'linda');
Coming soon... 🙈
# You found our next update. We are currently working on the Python SDK and will release it soon.
# If you are interested in the private Beta, we can send you an early build.

if interested == True:
  # Please contact us
  write_email('hello@spaceblocks.cloud')
Coming soon... 🙈
// You found our next update. We are currently working on the Java SDK and will release it soon.
// If you are interested in the private Beta, we can send you an early build.

if (interested == true) {
  // Please contact us
  WriteEmail('hello@spaceblocks.cloud');
}
Coming soon... 🙈
// You found our next update. We are currently working on the Go SDK and will release it soon.
// If you are interested in the private Beta, we can send you an early build.

if interested == true {
  // Please contact us
  write_email("hello@spaceblocks.cloud");
}
Response:
false
List resources with permissions
Now let's show all invoices, where Alice has the read permission. As Alice has the Internal role assigned, this should return all invoices.
This is helpful, if you want to show a list of resources, but only want to show the resources, where the user has the permission to access it.
- API
- C#
- JavaScript
- Python
- Java
- Golang
curl -i --location "$PERMISSIONS_URL/management/tenants/default/resources/invoice?subjectId=alice&permissionScope=invoice&permission=read" \
  --request GET \
  --header "Content-Type: application/json" \
  --header "Authorization: Bearer $ACCESS_TOKEN" \
  --header "apiKey: $API_KEY"
var resources = await client.ResourceApi.ListResourcesAsync(
  tenantId: "default",
  resourceTypeId: "invoice",
  subjectId: "alice",
  permissionScope: "invoice",
  permission: new List<string> { "read" });
const resources = await client.resourceApi.listResources('default', 'invoice', 'alice', 'invoice', ['read']);
Coming soon... 🙈
# You found our next update. We are currently working on the Python SDK and will release it soon.
# If you are interested in the private Beta, we can send you an early build.

if interested == True:
  # Please contact us
  write_email('hello@spaceblocks.cloud')
Coming soon... 🙈
// You found our next update. We are currently working on the Java SDK and will release it soon.
// If you are interested in the private Beta, we can send you an early build.

if (interested == true) {
  // Please contact us
  WriteEmail('hello@spaceblocks.cloud');
}
Coming soon... 🙈
// You found our next update. We are currently working on the Go SDK and will release it soon.
// If you are interested in the private Beta, we can send you an early build.

if interested == true {
  // Please contact us
  write_email("hello@spaceblocks.cloud");
}
Response:
[
  {
    "id": "1",
    "resourceTypeId": "invoice",
    "parent": {
      "id": "default"
    },
    "members": {
      "subjects": {},
      "groups": {}
    }
  },
  {
    "id": "2",
    "resourceTypeId": "invoice",
    "parent": {
      "id": "default"
    },
    "members": {
      "subjects": {},
      "groups": {}
    }
  }
]
What's next?
Now that you know how to configure and use the Permissions Space Block, you are ready to start integrating it into your application. For a deeper understanding, we recommend to read the concepts, take a look at some examples or dive into the Advanced section for more complex and hierarchical scenarios.